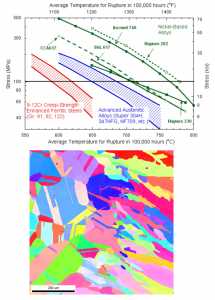
The next generation of advanced power plants in the United States will place high demands on the materials used to build them: steam turbine blades will continuously experience temperatures up to 750 ºC and stresses of 150 MPa for the lifetime of the plant. Designing materials to withstand these extreme conditions over a period of years requires a nuanced understanding of how candidate materials will respond across multiple length scales, from individual atoms to the full turbine blade component.
Mechanical characterization of a material is an integral part of the design and testing process that involves measuring a material’s response to applied stresses under a variety of conditions (including high temperatures). Traditionally, measurements on the deformation or strain in a material have been performed at relatively large length scales that are essentially measures of the average strain across an entire test sample. A more refined technique for measuring strain, digital image correlation (DIC), was developed in the 1980s and 1990s with the advent of modern computing. DIC involves patterning the surface of a sample with a random speckle pattern that can be imaged before and after deforming the sample; a computer subsequently tracks the relative displacement between each speckle to create a full-field “map” of strain across the sample surface. This is advantageous because it reveals heterogeneities in the way a material deforms, rather than providing a single “average” value of strain like traditional test methods. Although DIC has proven very useful at length scales on the order of millimeters, the resolution of cameras and optical microscopes used to acquire speckle pattern images has limited the technique’s utility at smaller scales.
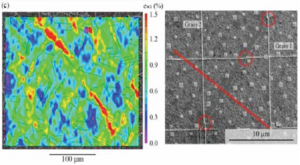
Through work at Nanotech West, the research group of Dr. Michael J. Mills has successfully deposited a micro-speckle pattern of HfO2 on samples of a nickel-base superalloy candidate for use in next-generation power plants. The speckle pattern is created via e-beam lithography: a resist is exposed with the desired pattern and the HfO2 is sputtered onto the sample surface. These speckles can be imaged in an SEM to provide strain maps with resolution on the order of hundreds of nanometers, which is the same length scale at which many high temperature deformation processes occur. This technique enables direct connection of a material’s microstructure (which can be adjusted through processing) with its local propensity to deform. The insights afforded by studies at these length scales will facilitate the development of next-generation materials for applications in extreme environments.
Figure 1: (Top) A plot of the applied stress and temperature that cause material failure in 100000 hours. Reproduced from J.M. Wheeldon, “Engineering and Economic Evaluation of 1300 °F Series Ultra-Supercritical Pulverized Coal Power Plants: Phase 1”, Electric Power Research Institute, 2008.
(Bottom) A weld in nickel-base superalloy Inconel 740H shows heterogeneous structure that contributes to strain localization.
Figure 2: A sample strain map produced by digital image correlation (left) and a sample with HfO2 speckles after deformation (right).


